The NSE cylinder head production line is a relatively advanced metal processing production line in the world, with high production efficiency and processing accuracy. However, since the production line was put into production, the pass rate of the cylinder head has not been high. Through a typical case, this paper introduces in detail the purpose of improving the pass rate of cylinder head test by solving the problem of plug overflow.
Leak test failure factor
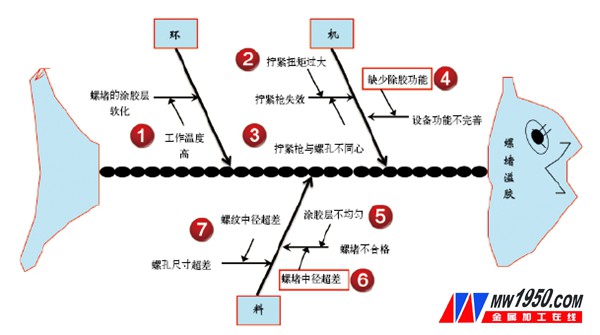
The types of problems in which the cylinder head fails to pass the test at one time are mainly screw plug overflow glue, screw plug leaking, stuffing cover leaking and plug torque over tolerance. According to the actual situation of the cylinder head leak test, according to the statistics, the ratio of the screw plug overflowing glue to the total number of test leaks of the cylinder head is 83.05%. If the problem is solved, the pass rate of the cylinder head one test leak can be greatly improved. Through the research and analysis of the same industry, we set the quality target of the cylinder head test failure rate to 96%. Through the brainstorming method, the reasons for the screw plugging were discussed, and the causal analysis fishbone diagram (see Figure 1) was drawn. Seven end factors were listed.

Figure 1 fishbone diagram
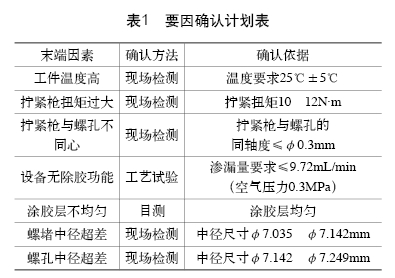
For the above-mentioned end factors, the cause confirmation schedule (see Table 1) was developed and confirmed one by one.
(1) High workpiece temperature The temperature of the workpiece before the leak test was checked by the temperature monitoring table of the washing machine, and the statistical results were all in compliance with the requirements (see Table 2). The conclusion is a cause.
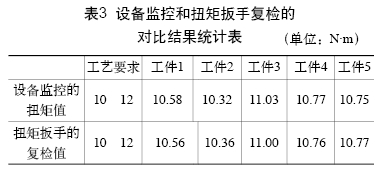
(2) Excessive torque of the tightening gun The torque check of the five cylinder heads was performed with a digital torque wrench. The recheck results are consistent with the monitored values ​​displayed by the equipment and both meet the torque tolerance requirements (see Table 3). . The conclusion is a cause.
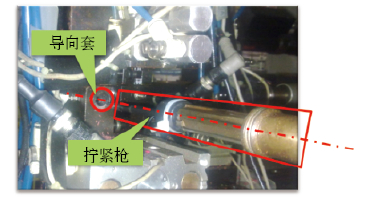
(3) The tightening gun and the screw hole are designed differently to make a special measuring rod, and the mandrel is used to simulate the tightening gun, and the coaxiality between the tightening grab, the guide sleeve and the screw hole of the cylinder head is measured (see Fig. 2), and the measurement is performed. The results meet the requirements. The conclusion is a cause.

Figure 2 Tighten the position of the gun and the screw hole
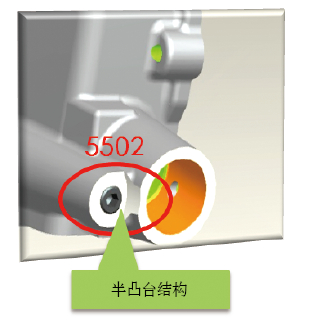
(4) The equipment has no glue removal function. We continuously tracked 20 cylinder heads, 4 of which have failed test results, and the 5502 hole screw plug surface of the cylinder head has more overflow. The 5502 hole plug surface is a "chair type" semi-bump structure (see Figure 3), which has the following disadvantages: when the screw is plugged, the overflow sealant will squeeze to the step surface, causing accumulation; the sealing plug for leak detection is limited The outer diameter. The overflow glue of the 5502 hole screw plug surface of the test leak unqualified part was removed by a brush, and the test leak was performed again, and all the results were qualified. It can be seen that in the case that the product structure is not changed in design, the glue removal of the 5502 hole screw plug surface before the test leak can greatly improve the pass rate of the cylinder head one test leak. The conclusion is the cause.

Figure 3 5502 hole screw plug surface structure
(5) Uneven coating layer The 1000 different batches of screw plugs were sampled with a magnifying glass. The results of the inspection were as follows: the surface of the screw plug was evenly coated, the thickness was uniform, and there was no accumulation. The conclusion is a cause.
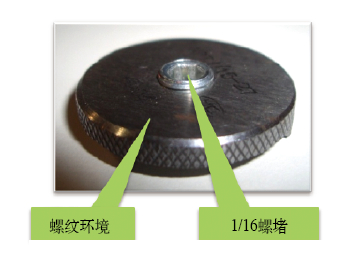
(6) The thread diameter of the screw plug is continuously checked for 100 screw plugs (see Figure 4): the middle diameter of the 4% screw plug exceeds the upper limit of the tolerance. If the screw with a large median diameter is tightened, the glue will be generated, which will cause the glue to overflow. The conclusion is the cause.
(7) The threaded hole of the 100 cylinder heads was detected by the thread plug gauge of the screw hole diameter (see Figure 5), and the measurement results all met the requirements. The conclusion is a cause.

Figure 4 Measuring the diameter of the screw plug

Figure 5 Measuring screw holes
Develop countermeasures
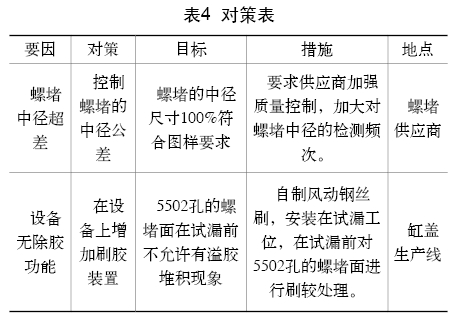
After analysis, it is finally confirmed that the equipment has no glue removal function and the screw diameter is too large, which is the main cause of screw plugging. A corresponding countermeasure table has been developed for these two factors (see Table 4).
Countermeasure implementation
(1) Countermeasure Implementation A notification screw plug supplier is required to strengthen the quality control, control the diameter of the taper pipe thread to the middle value of the tolerance, and increase the frequency of inspection of the product. After the screw plug supplier was rectified, we used the three-needle method to check the new batch of 20 bolts, and the measurement results were all qualified.
(2) Countermeasure Implementation 2 Add a brushing step between the screw plug assembly step and the test leak step, and automatically remove the sealant overflowing on the screw cover surface of the cylinder head 5502 before the leak test, thereby eliminating the screw plug. The effect of overflow glue on the test leak results.
Step 1: Assemble a set of pneumatic wire brushes with a pneumatic grinder and a wire brush.
Step 2: Design and manufacture a special tooling for clamping and installing pneumatic wire brushes.
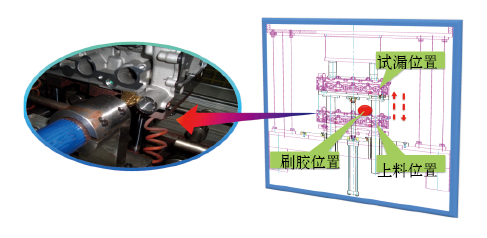
Step 3: Install the pneumatic wire brush and special tools on the test leaking station of the machine tool (see Figure 6). The specific method is as follows: The wire brush is directly facing the hole of the cylinder head 5502 at the loading position, when the cylinder head is from When the feeding position rises to the leak detection position, the wire brush automatically completes the brushing work, which does not affect the production cycle; in order to achieve the best glue removal effect, the "knife" depth of the wire brush is set to 3 mm.

Figure 6 Installation of pneumatic wire brush
Step 4: Connect the air pipe of the pneumatic wire brush to the air source control cabinet of the machine tool, and install a flow control valve on the pipeline to control the rotation speed of the pneumatic wire brush.
Effect check
The SPC analysis was carried out on the test data of one test leak of the cylinder head (continuous 100 cylinder heads), and the Ppk value was 1.86>1.67, and the process performance index satisfies the requirements.
Conclusion
In order to consolidate the test results, we require the screw plug supplier to modify the "Product Inspection Specification", increase the inspection frequency of the screw diameter, and modify the "Device Check Card" and "Process Guide" respectively. The routine maintenance and inspection methods of the brushing device are clarified, so that the qualification rate of the cylinder head at one test is greatly improved.
Galvanized Roller Shutter Door
Using advanced hot-dip galvanized material , precision roll forming production process, polyurethane foam that free of hydrofluorocarbon inside door, light weight, high strength, appearance nice. The doors have advantages of tamper anti-theft , noise isolation thermal insulation and corrosion resistance;the doors are widely used in shops, garages, houses, supermarkets, warehouses and industrial plants,etc.
Depending on the characteristics of the buildings,we can choose interior, exterior and intermediate three different installation ways, doors stay in the upper part of door after rolling up , this could save garage space, and also could keep the garage clean and beautiful by prevent the mud, rain and snow ,etc going into the garage.
Galvanized Roller Shutter Door,Standard Galvanized Roller Shutter Door,Automatic Galvanized Roller Shutter Door,Steel Roller Shutter Safe Door
Shenzhen Hongfa Automatic Door Co., Ltd. , https://www.highspeedshutterdoor.com
